
Now that you have learned about a few body systems we are going to engage in a group project. This project will be completed in three separate, but ultimately connected, parts.
Part 1: During the first stage you will work as part of a small group to construct a physical model of either the digestive or respiratory system.
Part 2: During the second stage you will work with a partner to create a 3D digital model of the human heart.
Part 3: During the third and final stage of the project you will work independently. You will connect the first two parts of the project and will create a recording demonstrating your understanding of the connection between the two systems you learned about.
Part 1
For this part of the project, I have put you in groups of four. With your group, you need to choose which systems you want to learn more about. You can choose either the digestive or respiratory system. All groups will be learning about the circulatory system in more depth in part two of the project. You need to construct a physical model of the system that your group chooses. Use what you learned in prior lessons to guide your thinking.
- All parts and organs of the system must be represented.
- The size of the model should be proportional to one member in your group. You will need to research the approximate size of objects and build your models accordingly.
- The materials you choose to use should also reflect characteristics of the actual organ they are representing. (i.e. A hard cardboard tube would make a great trachea but not a great stomach!).
When you are done, take a picture and add it to the Padlet below...
Part 2
You are going to be doing some 3D modelling! I am now going to break your group up into groups of two. You will be using a laptop for this project. Your job is to create a 3D model of a human heart. Follow the directions below to get started…
1) Go to 3dsplash.net and log in with your account.
2) Create a new project and select a classic model.
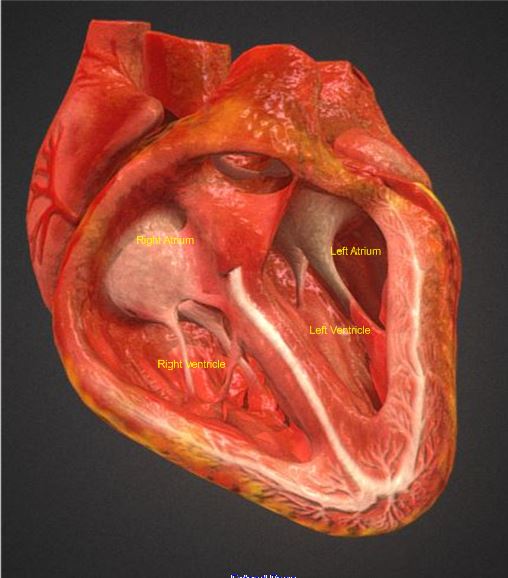
3) I will provide you with three pictures that you will use to help you create your model. Right-click on them below and select “Save Image As”. Save them in your pictures. You will need to upload the pictures to 3dspash.net during the next step.
1) Go to 3dsplash.net and log in with your account.
2) Create a new project and select a classic model.
3) I will provide you with three pictures that you will use to help you create your model. Right-click on them below and select “Save Image As”. Save them in your pictures. You will need to upload the pictures to 3dspash.net during the next step.

|

|
|
4) Create a new project spend some time playing. Figure out what all of the tools can do. What are those bars along the bottom and right hand side? When you think you know enough to start watch the video below...
5) Your job is to create an accurate 3D model of the human heart. Keep designing until your heart looks as realistic as possible. Your model must include a pathway that connects the pulmonary veins, left atrium, left ventricle and the aorta. Make your model as accurate as possible, but don’t expect to make it perfect. Use the bar along the bottom and right side of the page to look inside the heart and help you create the connection. Explore the tools available to you. There are always ways to repair any part of the model.
6) If you know what to do, go right ahead. If you need a little more help watch the video below…
Part 3
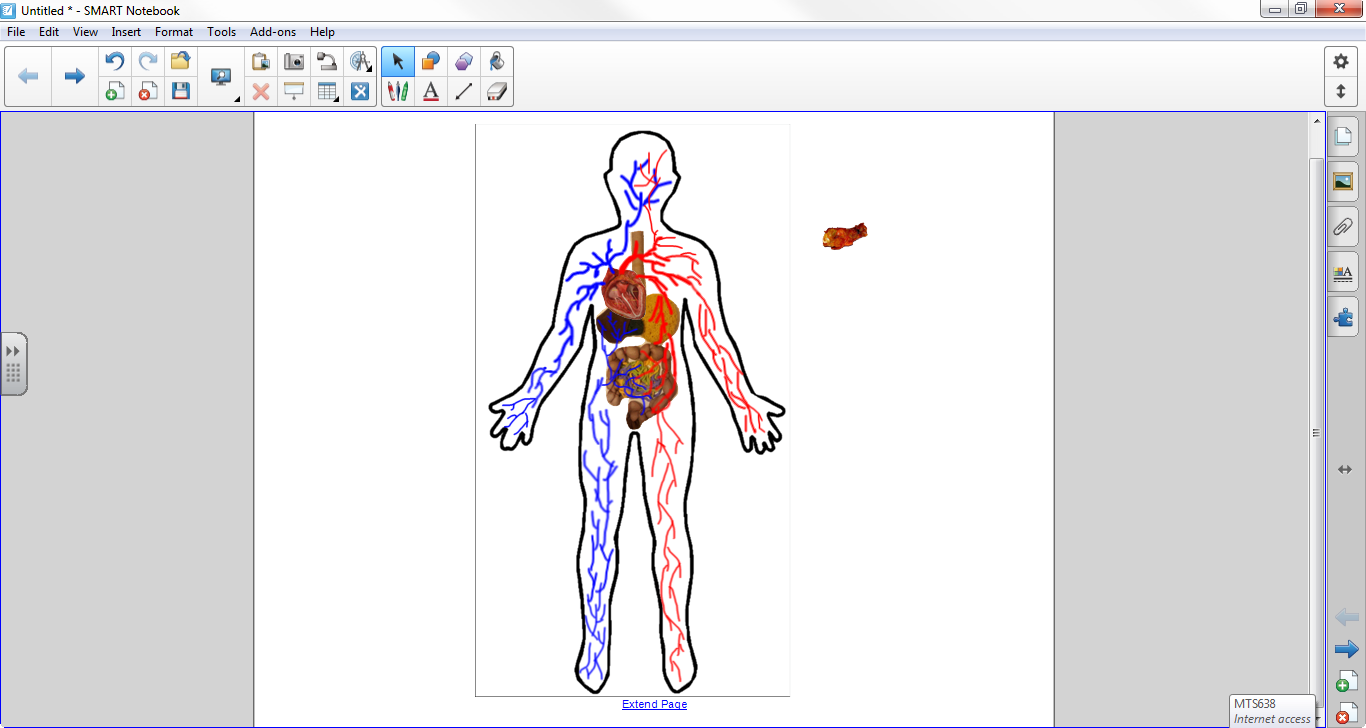
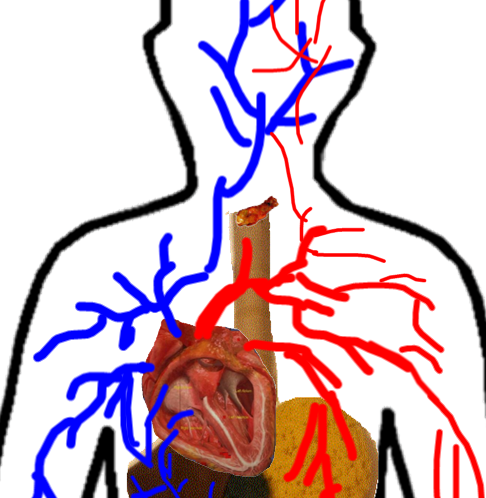
You will work independently for this part of the project. It is now time to connect the digestive or respiratory system (whichever you chose) to the circulatory system. We will be using SMART Notebook (You can also use https://sketch.io/sketchpad/) for this part of the project. You will need to take a picture and a screenshot of your project in Part 1 and Part 2. You will use the Snipping Tool to piece the pictures together. Cut out a picture of your digestive system and of your heart model. Use the Free Form tool to cut out only what you want. Your job is to create a picture representing both the circulatory system and the digestive/respiratory system together. You will need the following picture. Right-click on it below and select “Save picture as." Save it in your pictures.
Try to do it yourself but if you need help using the technology feel free to ask your friends.
Try to do it yourself but if you need help using the technology feel free to ask your friends.

Open up the SMART Board Software and start designing your human body. Look at the example below and notice the details. What parts are missing from the circulatory system? Why are the blood vessels different sizes? Can you see the connection between the digestive and circulatory system? What details can you put in your picture to show everything that you know? Make sure to label all of the parts of your diagram.
Think of all of the knowledge you now have about the human body. For the last part of the project you are going to to put it altogether and answer the following questions. How does nutrient/oxygen travel through your body and end up in your tissue and muscles? What path do they take? What organs help along the way?
For the last part of the project you will record yourself showing and explaining the journey of either a chicken wing or an oxygen atom, depending on the system you selected. You need to explain what is happening as you move the nutrient/atom through the systems. You will need one of the following pictures. Right-click on it and select “Save as Picture.” Save it in your pictures. You could find a picture of your favorite food if you would prefer.
For the last part of the project you will record yourself showing and explaining the journey of either a chicken wing or an oxygen atom, depending on the system you selected. You need to explain what is happening as you move the nutrient/atom through the systems. You will need one of the following pictures. Right-click on it and select “Save as Picture.” Save it in your pictures. You could find a picture of your favorite food if you would prefer.

|

|
You can either page record in SMART Notebook or use a screen recording tool. You will be marked on the amount and accuracy of the information you include in your description. Your description must start when the nutrient/oxygen are outside the body and can end after passing through the heart and reaching a realistic final destination. You can draw anything or add/change anything you would like to help demonstrate your knowledge. You can make notes and practice as many times as you want. If your feeling confident, start recording and see how you do. It will help you figure out what you might need to review.
Hint: Zooming in will make it much easier to show your thinking…
Hint: Zooming in will make it much easier to show your thinking…
When you are done, upload it to Youtube and add it to the Padlet below!
